SOCIAL MEDIA

Showing posts with label Recipes. Show all posts
This post is sponsored by Hiland Dairy, but the content and opinions expressed here are my own.

As we prepare for the impending ice storm that is all anyone can talk about right now, it is pretty much the perfect time to bake up some tasty muffins to have on hand just in case we really do lose power! It is no secret that I love baking muffins, and working with Hiland dairy as a sponsor this month gives me the perfect opportunity to share a new recipe! There are a number of reasons why I like muffins, starting with the fact that my husband is not a breakfast eater. We hear all the time that it is super important to start the day with a healthy breakfast, but he has a hard time making that happen. I have found that if I keep muffins on hand it is much more likely to put something in his stomach before he begins his physically-demanding workday.


Whole Grain Blueberry Cream Muffins

Saturday, January 14


This year I hosted Thanksgiving for 25 people, and if I learned (or rather RE-learned) one thing it was to always have plenty of baked goods on hand! I knew that some of our guests would be staying for a few days, so I had whipped up some tasty treats for breakfast for these guests. I admit I was a little surprised when everything was gone before the morning after our big feast even arrived! For Christmas, I will be baking up a cookie storm (as usual) but I also wanted to come up with a great breakfast to serve... preferably one that would store well and be ready to go first thing in the morning for our early birds.

Of course, when I think about breakfast I am all about the coffee. I tried this amazing Mocha Iced Coffee from Hiland Dairy, and knew I wanted to make a mocha treat for my visitors. I also wanted something fairly substantial with whole grains to keep my guests happy. Baked oatmeal sounded like the perfect solution! So, I am excited to share this new {quick & easy} recipe today.


Great recipes start with great ingredients, and I am particularly happy to be partnering with Hiland Dairy to bring you this recipe. We talk a lot about shopping local for gifts during the holidays, and with these quality dairy products from local farmers I can do that with my baking as well! Not only that, but Hiland Dairy is giving away a year's worth of products for the holidays! Just think of the extra goodies you could make! Be sure to enter to win HERE.


Mocha Baked Oatmeal with Cherries, Flax and Walnuts


3 cups oats
1/3 cup milled flax seed
2/3 cup sugar
2 tsp baking soda
3 eggs, beaten
1/2 cup Hiland Dairy butter, melted
1 cup Hiland Dairy Mocha Iced Coffee
1 tsp vanilla extract
1 cup dried cherries
2/3 cup walnuts

In large bowl combine oats, flax seed, sugar and baking soda. Stir in eggs, butter, vanilla and Hiland Dairy Mocha Iced Coffee. Add in dried cherries and walnuts, and stir until well mixed. Pour batter into a 9x13 pan coated with cooking spray. Bake at 350 degrees for 25-30 minutes. Cool and cover until ready to serve.


Do you have a favorite breakfast for serving to overnight guests? I would love to hear about it! And don't forget to pop over and enter the GIVEAWAY from Hiland Dairy!

(Feel free to pin this recipe for later!)


Make it a Merry Mocha Morning!

Monday, November 28

Thank you to Bertolli for sponsoring today's post and inspiring me to celebrate the everyday with delicious food and fun family memories!


For months now I have been talking about wanting to make homemade ravioli for the first time. When I saw the Bertolli® Riserva Asiago Cheese & Artichokes sauce, I knew that I just had to finally do it. Something about the idea of artichokes in the sauce seemed to just be asking to be paired with a spinach ravioli! And let me tell you... it ended up being a match made in heaven! I had been putting off making homemade pasta because life is chaotic. I kept thinking that this would be a big undertaking... and a big mess. But it is so important to do special things like this to celebrate everyday life! There is no need to wait for a special occasion! The Bertolli cooking school website makes it easy to find little ways to bring something special to all kinds of meals! Of course this one caught my eye: 


The only pasta I have ever made from scratch before was egg noodles, and I wanted the thick, chewy ones so I just rolled them out with a rolling pin and cut them by hand. I knew for ravioli it would be much more beneficial to use a pasta roller, so I borrowed one from my brother. We used the recipe that came with the roller, and it couldn't have been easier: 500g flour (I used half white and half whole wheat) and 5 whole eggs. Then we just mixed in a little water until it was the right consistency. Aiden's favorite part of the whole process was playing with the flour. My awesome husband jumped in to knead the dough for me. We wrapped it in plastic wrap to rest, and set it aside.


While the dough rested, we made the filling. I looked at many, many recipes for filling, but I couldn't find one that sounded just right. So, I decided to go ahead and just create my own. It turned out creamy and delicious! Not only that, but I used the food processor to whip it up so it was super easy! Here is the recipe: 

Creamy Spinach and Cheese Ravioli

1 T butter
1 tsp minced garlic
10 oz fresh spinach
8 oz ricotta
4 oz cream cheese
1/2 c shredded mozzarella
1/2 c finely shredded Parmesan
1 egg

Melt butter in pan and lightly saute spinach and garlic. Transfer to food processor to finely chop spinach. Add remaining ingredients, and process until creamy. Refrigerate until you are ready to fill ravioli. 


Next it was time to roll out the ravioli! Aiden was super tired by this point (he was sick all last week) but he loved using the pasta roller so much! He rolled the same piece of dough over and over and we had a hard time talking him into letting Matt roll out sheets for the ravioli!


Eventually, Matt was able to start rolling and filling our ravioli. We tried several different methods of cutting them, from the cutting wheel to biscuit/cookie cutters, but in the end the most fabulous raviolis were those made using a little Rubbermaid Tupperware container to cut out the finished ravioli! We used about a tablespoon of filling in each, and brushed egg white around the filling before adding the top sheet and cutting. Matt is seriously a natural at ravioli making! He is already talking about other recipes he wants to try!


Of course the best part was eating the finished product! We made about half of the ravioli fresh that night, and froze the other half to see how they cooked up from frozen. Both turned out great! We used the Bertolli® Riserva Asiago Cheese & Artichokes sauce and a little shredded Parmesan and it was so delicious!


I love that these sauces are not your typical spaghetti sauce. They are really something special! However, while they offer a more robust and exciting flavor profile, they are still very kid friendly... at least according to Aiden who enjoyed his bowl for sure!


I definitely want to try the other sauce flavors in this Riserva collection:

Bertolli® Riserva Marinara with Parmigiano-Reggiano
Bertolli® Riserva Porcini Mushrooms & White Truffle Oil
Bertolli® Riserva Balsamic Vinegar & Caramelized Onions

The fact that there is currently a $1.50 coupon will make it even better to try them all! Grab your coupon here!


And be sure to visit Bertolli on Facebook and Tumblr as well!

 Linking up with: Dream Create Inspire | The Wednesday Showcase
  What recipes have you been waiting for a good reason to try? I hope this encourages you to make every day a good reason to celebrate and try something new!

Homemade Spinach and Cheese Ravioli

Monday, January 11

Thank you to Ragu for sponsoring today’s post and inspiring me to pass on my family traditions.

One of the things I really want to do here on the blog this year is share some of my freezer meal recipes. Freezer meals are a great way to save both time and money while making sure the meals you are serving are high quality! I will often spend a weekend working on freezer meals that will last us for a month or so (because I don't use them every night, just a few times a week). Our little tradition is that I will cook up a storm while my awesome husband does the dishes! 

Now that Aiden is old enough to start helping out in the kitchen it is truly a family activity! I am always on the lookout for new recipes, and Aiden loves to help me look through cookbooks and recipe sites. However, there are also family favorites I know I should make every time. These make-ahead Turkey & Veggie meatballs are always on the list when I get cooking! The are a big hit with both Matt and Aiden, and are healthy and convenient, too. Especially when I keep a jar of Ragu handy for dipping sauce and so I am ready to add some pasta to make it a meal.

These healthy, make-ahead meatballs with added veggies are a great way to add extra nutrition into your diet! A simple freezer meal with both lean protein and vegetables is made complete with pasta sauce for dipping!

I always include this recipe for 3 reasons:
  1. They are easy to make and don't require a bunch of pots and pans (when you are making many recipes in a day, this is extra helpful!)
  2. They are healthy and the added veggies are a bonus!
  3. They are versatile! Having these meatballs frozen is great for quick lunches or more complex dinner possibilities!

These healthy, make-ahead meatballs with added veggies are a great way to add extra nutrition into your diet! A simple freezer meal with both lean protein and vegetables is made complete with pasta sauce for dipping!

While Aiden is a good eater (usually) we could all always use more veggies in our diet! I have found that when it comes to meatballs using a grater to get the vegetables really fine is helpful. And don't forget to squeeze the moisture out of your zucchini before adding it to the mixture!


Make-Ahead Turkey & Veggie Meatballs


INGREDIENTS:
1 lb ground turkey
1/4 c. grated carrot
1/4 c. grated zucchini (squeeze to remove water)
1/4 c. finely chopped spinach
2 T Ragu pasta sauce
¼ cup plain breadcrumbs
¼ cup grated Parmesan cheese
1 large egg
1 ½ tsp no-salt Italian seasoning
salt and pepper to taste

DIRECTONS:
Mix ingredients well, and roll into balls about the size of a golf ball. Place meatballs into mini-muffin pan, and bake at 350 degrees for 30 minutes or until cooked through. Flip the meatballs halfway through. After meatballs have cooled, flash freeze on a cookie sheet and then store frozen meatballs in a freezer bag.

These healthy, make-ahead meatballs with added veggies are a great way to add extra nutrition into your diet! A simple freezer meal with both lean protein and vegetables is made complete with pasta sauce for dipping!

Baking these meatballs in a mini-muffin tin is super handy! TIP: Depending on the fat content and quality of ground turkey, sometimes turkey meatballs tend to bake up a little soggy at first. I just throw them back in the oven on a wire rack on top of a cookie sheet for a few minutes to finish them!

These healthy, make-ahead meatballs with added veggies are a great way to add extra nutrition into your diet! A simple freezer meal with both lean protein and vegetables is made complete with pasta sauce for dipping!

Having a bag of these meatballs in the freezer is super handy because they can be served in a number of ways! Our favorite way to use them is to heat a few up in the microwave and serve them with a bowl of Ragu pasta sauce for dipping! Aiden loves when I make him this for lunch!


And of course meatballs are always good for serving covered in delicious sauce on top of spaghetti! (Are you singing the meatball song in your head now? Ha!) Or made into a meatball sub... or covered with barbecue sauce... the possibilities are endless!

These healthy, make-ahead meatballs with added veggies are a great way to add extra nutrition into your diet! A simple freezer meal with both lean protein and vegetables is made complete with pasta sauce for dipping!


 Don't forget to visit the Ragu website for recipe inspiration and more!


Do you have a favorite freezer meal recipe? Be sure to share! 


Make-Ahead Turkey and Veggie Meatballs {Freezer Meal Recipe}

Tuesday, January 5


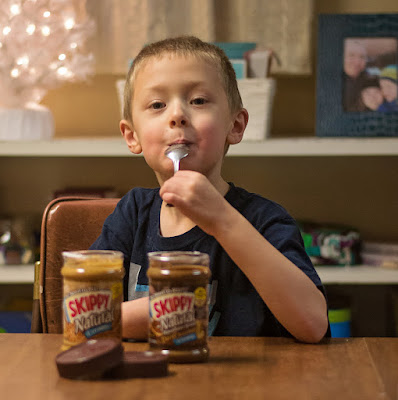
Let's just be honest here... we eat a lot of peanut butter in this family. While Aiden is a good eater, he still loves his PB&J sandwiches and I don't mind that one bit. Especially when we are out on the go, since they don't need to be refrigerated! So, when I was offered the opportunity to work with SKIPPY® Natural to do some holiday baking I was super excited. Aiden was too... especially when he got to be the "taste tester" before we began.


These quick and easy dark chocolate peanut butter cereal treats are the perfect choice for the holidays! One simple recipe gets you two fun and tasty desserts perfect for sharing! Add these to your Christmas cookie list, and grab a coupon for SKIPPY Natural to save on ingredients! #spon


I do traditionally make a couple of different peanut butter cookie recipes this time of year, but I wanted to try something a little different when I saw that one of the SKIPPY® Natural varieties was dark chocolate. Yum! Aiden is totally into gingerbread men this year, so we decided to make some Dark Chocolate Peanut Butter Cereal Bars and cut them into gingerbread shapes. Of course, cutting them into shapes meant that there were "scraps" left over. Unlike when you are cutting sugar cookies, you cannot simply re-roll rice crispy treats. SO... I decided to turn them in to delightful little chocolate covered cereal balls!

These quick and easy dark chocolate peanut butter cereal treats are the perfect choice for the holidays! One simple recipe gets you two fun and tasty desserts perfect for sharing! Add these to your Christmas cookie list, and grab a coupon for SKIPPY Natural to save on ingredients! #spon #SKIPPYYIPPEE


This particular recipe does not require the standard marshmallows and butter, which was nice since I didn't have marshmallows on hand but I did have all the ingredients I needed to make these treats! Of course you will want to visit this page to grab a coupon and a find a local Walmart that carries SKIPPY® Natural to make sure you have what you need to get baking!!


INGREDIENTS

4 cups crispy rice cereal
1/2 cup sugar
1/2 cup light or dark corn syrup
1/2 cup SKIPPY® Natural Creamy Peanut Butter with Dark Chocolate
Chocolate Almond Bark (for covering cereal balls)
Decorative touches for gingerbread men


INSTRUCTIONS

  1. Line cookie sheet with plastic wrap and spray lightly with cooking spray.
  2. Pour cereal into large bowl.
  3. In medium saucepan, bring sugar and corn syrup to a boil over medium heat, stirring occasionally. Boil 1 minute; remove from heat.
  4. Stir peanut butter into corn syrup mixture until smooth. Pour over cereal; stir to coat. Press evenly into cookie sheet, making it the desired thickness for gingerbread men.
  5. Let treats cool slightly, and then cut your gingerbread shapes with cookie cutter. 
  6. Once your shapes are all cut out, roll the remaining scraps of cereal treats into balls.
  7. Melt your almond bark according to package directions, and cover each of the cereal treat balls with chocolate and place on foil to cool and harden. Add sprinkles if desired. 

As you can see, I had great help for following these directions!


These quick and easy dark chocolate peanut butter cereal treats are the perfect choice for the holidays! One simple recipe gets you two fun and tasty desserts perfect for sharing! Add these to your Christmas cookie list, and grab a coupon for SKIPPY Natural to save on ingredients! #spon #SKIPPYYIPPEE

While creating tasty peanut butter treats was one of the end goals of this cooking adventure, it is equally important to have fun some fun with my son (which also means not worrying about the giant mess we made in the process.) He loves to be in the kitchen, and has been helping me with cooking and baking since he could first stir with a spoon! So for us the holiday baking is about more than the actual baked goods... it is about spending time together in the kitchen and sharing the love with friends and family once the treats are done.

These quick and easy dark chocolate peanut butter cereal treats are the perfect choice for the holidays! One simple recipe gets you two fun and tasty desserts perfect for sharing! Add these to your Christmas cookie list, and grab a coupon for SKIPPY Natural to save on ingredients! #spon #SKIPPYYIPPEE

Thank you to SKIPPY® Peanut Butter for sponsoring today’s post and inspiring me to try a new holiday recipe! Be sure to visit the SKIPPY® Peanut Butter Website for recipes, baking tips and more! Grab a coupon while you are there, and make sure to create some great memories while baking with your family this holiday season!

What recipe do YOU most look forward to making this year?


Dark Chocolate Peanut Butter Cereal Bars - 2 Ways!

Saturday, December 19

Get the holiday party started with this simple Rum Balls recipe! No-bake treats that are sweet and tasty... a special something for the grown-ups! These are great for Christmas, but don't forget to make them ahead!


I have no idea why I first made rum balls. I would assume it was a request from Matt's co-workers, although I have to say that after actually eating these I now know they probably weren't workplace appropriate! Ha! No wonder his co-workers requested them! Nothing like a couple rum balls to make a day behind a desk more bearable. Anyhow, this recipe is simple and festive. Just don't let the kiddos lick the spoon. And if you have never made rum balls, the instruction to leave them in a sealed container for a week is legit. You could eat them right away but they will knock your socks off!

Ingredients

  • 1 cup semisweet chocolate chips
  • 1/2 cup white sugar
  • 3 tablespoons corn syrup
  • 1/2 cup rum
  • 2 1/2 cups crushed chocolate creme wafers (waffle cookies as my sister calls them)
  • 1 cup chopped walnuts (optional)
  • 1/3 cup confectioners' sugar

Directions

  1. Place chocolate chips into a microwave-safe medium bowl. Heat in the microwave for 1 minute, stir and then continue to heat at 20 second intervals, stirring between each, until melted and smooth. Stir in sugar and corn syrup. Blend in rum. Add crushed vanilla wafers and chopped nuts. Mix until evenly distributed. Cover and refrigerate until firm.
  2. Roll the chilled chocolate mixture into bite-size balls. Roll balls in a mixture of ground nuts and confectioner's sugar, or just plain confectioner's sugar. Store in a covered container for a week before serving to blend the flavors.
Linking up with: Dream. Create. Inspire.

Now it is YOUR turn to share a recipe or craft for the holidays for the #HFTHBlogHop!! 

With the holidays just around the corner, we want to share our favorite Traditions, Gifts, Decor, Food & more and we want to know YOURS! Join your hosts Neely, Branson, Lauren, Julia and Natasha the first week of December as we link up and step into your home for the holidays! 

The days for this blog party will be themed... link up as many posts as you like each day, as long as they fit the theme for the day! 

  • Monday - Gifts 
  • Tuesday - Recipes/Crafts 
  • Wednesday - Traditions/Activities
  • Thursday - Decor
  • Friday - Free for All! (Link up any holiday-related post, or make up for any of the days you missed!)

Make sure to link up with us every day and use the hashtag #HFTHbloghop to share photos and posts on social media. We will be retweeting and reposting your posts throughout the week... and on through the holidays! We will also pin our favorites to the Home for the Holidays pinterest board! Come join the fun - find some new blogs and get your blog out there while spreading cheer throughout the blogosphere! 

It would be lovely if you would follow each of your hosts in some way! Feel free to give a shout out when you do so we can follow you as well!


Natasha @ Natasha Byrd

Julia @ The Quiet Grove 


Click to tweet and help us spread the word! 

Tweet: Join the #HTFHbloghop and spread holiday cheer throughout the blogosphere! http://bit.ly/1j84im9 @neelykins @bransonmerrill @talkofthetrains

Grab a button! 

Home for the Holidays Blog Hop
<div align="center"><a href="http://www.myreflectionofsomething.com/p/htfhbloghop.html" rel="nofollow" title="Home for the Holidays Blog Hop" target="_blank"><img src="https://blogger.googleusercontent.com/img/b/R29vZ2xl/AVvXsEg9fgqioqDC10NmAYpUSczvQMYN5Mvr0v5PKl6M52PXhb569gDASB0oRx_pCkiYPylbKDWXtYehVDOioGU4XXSTrmKHrcPC-rQabnQwKUnLpk09ZqIxVmKu_NoXn2TwEADnQJ5-YTUOnZuo/s320/HFTHbloghop.png" alt="Home for the Holidays Blog Hop" style="border:none;" /></a></div>

A holiday treat for the grownups this year... Rum Balls! - #HFTHBlogHop

Tuesday, December 1

"Pumpkin Pie" cookies are made with a box cake mix, and surprisingly enough... no pumpkin! Yet they have that flavor of the season in a soft cookie that people can't get enough of! This recipe is one that is super versatile and so fast and easy that you will want to experiment with other variations for sure!


"Pumpkin Pie" Cookies 

I am a firm believer in having some simple recipes up my sleeve. Even better are simple recipes that taste like they are something special. This is one of those! Technically, these are gooey butter cookies. However, when you use spice cake mix instead of yellow, you get cookies that taste amazingly like pumpkin pie!! Soooo yummy! Here is the simple recipe for these tasty little morsels...

Ingredients
1 (8 ounce) package cream cheese
1/2 cup butter, softened
1 egg
1 teaspoon vanilla extract
1 (18.25 ounce) package spice cake mix
1/4 cup confectioners' sugar

 Directions
1. Preheat oven to 350 degrees F (175 degrees C).
2. In a medium bowl, cream together the cream cheese and butter. Stir in the egg and vanilla. Add cake mix, and stir until well blended. Roll into 1inch balls and roll the balls in the confectioners' sugar. Place 1 inch apart onto an ungreased cookie sheet.
3. Bake for 10 to 13 minutes in the preheated oven. Remove from baking sheets to cool on wire racks. 

Enjoy!

Linking up with: Dream. Create. Inspire.

If you enjoyed this post, I would love it if you would sign up for my weekly email newsletter! I look forward to sharing more with you through this little bit of happiness sent to your inbox each week!


"Pumpkin Pie" Cookies

Wednesday, November 25

Today you can find me over at Behind the Camera and Dreaming where I am sharing one more fall recipe... and it is another awesome one! These Harvest Muffins are a breakfast staple in our home! Not only can you find MY recipe over on her blog, you can link up yours AND enter an awesome giveaway for $20 PayPal Cash!

Check it out...


{Guest Post} Harvest Muffins - Fall Recipe Link-Up

Thursday, September 17


I admit it... I am one of those people who goes pumpkin crazy when the season starts to change. So, even though my german apple cake was already a pretty fall friendly recipe, I just had to try it with pumpkin in place of some of the oil. More flavor, less fat... win-win! 

This cake is dangerously delicious! So, I decided that I would try baking it in little mason jars at one point, and I have done it that way ever since! For a sweet, rich dessert like this sometimes less is more. For perfect little single serving cakes use half pint, wide mouth mason jars! Just remember to handle with care as they get HOT. They also store really well with the lids on in the fridge, and you can pop one in the microwave for 45 seconds or so to warm it back up. Serve with whipped cream and a sprinkle of cinnamon.


Ingredients:

2 cups all-purpose flour 
1 teaspoon baking soda
2 teaspoons pumpkin pie spice 
1/2 teaspoon salt 
1/4 cup coconut oil 
3/4 cup canned pumpkin
2 eggs 
1 3/4 cups brown sugar 
1 teaspoon vanilla extract  
4 cups apples - peeled, cored and diced small

Directions:

Preheat oven to 350 degrees. Spray 12 half pint mason jars with cooking spray. Beat together oil, pumpkin and eggs until creamy. Add brown sugar and vanilla and beat well.
Add flour, baking soda and pumpkin pie spice. Mix until combined. The batter will be very thick. Stir in the apples by hand. Measure 1/3 cup batter into each mason jar.
Bake at 350 degrees F for 25 minutes or until cake tests done. 

Caramel Sauce

1/2 cup butter 
1/2 c. brown sugar 
1/4 c. cream
1/2 tsp vanilla

Melt butter in saucepan over medium heat. Stir in brown sugar and cream. Bring to a boil, stirring constantly, for 3 minutes. Remove from heat and stir in vanilla. Spoon over warm cakes. 


Find more great Fall inspired recipes at Behind the Camera and Dreaming!


Pumpkin Apple Cake with Caramel {Mason Jar Recipe}

Tuesday, September 15

peanut butter breakfast muffins PBJ


Sometimes great recipes come about simply because ingredients need to be used up. That was the case with these Peanut Butter Breakfast Muffins. I had bought the peanut butter I used from Trader Joe's, thinking I would like it... but I really did not. However, I knew it would probably make delicious muffins. I was right!

peanut butter breakfast muffins PBJ


I had considered going for a PB&J muffin, and briefly thought about adding a bit of jam in the centers, but decided to go with the craisins instead. So they are more like Peanut Butter and (almost) Jelly Muffins... I think Peanut Butter Breakfast Muffins is probably a better name, though. They are not too sweet, and with 5g of protein and 4g of fiber they are a decent way to start the day. With coffee, of course... lots of coffee! (And perhaps some green juice. But I am drifting off topic here... how about the recipe?!)

peanut butter breakfast muffins PBJ


Peanut Butter Breakfast Muffins

yield: 29 muffins (I never bake anything without making enough to share!)

2.5 cups whole wheat flour
1.5 cups whole grain oats
1 cup brown sugar
2 T baking powder
1 tsp salt
2.5 cups almond milk
1 cup trader joes crunchy peanut butter with flax and chia seeds
2 eggs
1 tsp vanilla
5oz blueberry craisins (or any flavor, this is what I used)

Now here is where a real food blogger or recipe author would share proper instructions. This is the main reason I am not a food blogger or recipe author (well... at least one of the many reasons!) I pretty much just mixed it all in a bowl. I used silicone baking cups lightly sprayed with coconut oil cooking spray, and put approximately 1/4 cup of batter in each. I baked them in my truly wacky oven for 14 minutes at 325 degrees. In a normal oven I would *guess* that is something like 350 degrees for 18(ish) minutes. I am not kidding about my oven being wacky... another good reason I am not a food blogger. I was really pleased with how they turned out, and Aiden has been gobbling up, so I feel free calling them preschooler-approved! (FYI... see the nutrition information below? There is a disclaimer there... I used myfitnesspal to calculate it. I am no nutrition expert so it is only as accurate as anything on the internet ever is, ha!)

peanut butter breakfast muffins PBJ

Peanut Butter Breakfast Muffins

Monday, April 13

I finally found a local freezer meal swap group, and I am so excited! I love freezer meals, and this will be a chance for me to branch out and keep the freezer stocked. For this first meeting I played it safe and did a yummy, veggie-packed ranch chili and cornbread. Now that I know how it works I can get a little more adventurous next time I think! Here is the recipe for the chili:

Ranch Bean Chili

1 lb lean ground beef
3/4 c. chopped onion
1 large carrot, peeled and diced small
1 of each: green, yellow, red, orange bell pepper, chopped
1 tsp minced garlic
1 can dark kidney beans, drained and rinsed
1 can light kidney beans, drained and rinsed
1 can chili beans with sauce
1 lg can crushed tomatoes
1-1/3 cups frozen corn
1 cup water
1 envelope ranch salad dressing mix

Cook beef, onion, carrot and peppers over medium heat until meat is browned and vegetables are tender. Drain. Add remaining ingredients, bring to a boil. Reduce heat, cover and simmer 15 minutes. Cool and transfer to freezer containers. Freeze up to 3 months. To use frozen chili thaw in the refrigerator then heat through in sauce pan or crock pot.


Ranch Bean Chili {Freezer Meal}

Tuesday, October 16


I have been working on these recipes for quite some time to make them both nutritious and delicious. Here are the three current versions of the recipes, all in one place! Enjoy!

Zucchini Carrot Apple Muffins

1 1/2 cups whole wheat flour (or 3/4 c. wheat 3/4 c. white)
3/4 cup milled flax seed
3/4 cup old fashioned oats
3/4 cup brown sugar
2 teaspoons baking soda
1 teaspoon baking powder
1 teaspoon salt
2 teaspoons ground cinnamon
1 teaspoon nutmeg
1/4 teaspoon ground cloves
3/4 cup unsweetened almond milk
2 eggs, beaten
1 tablespoon vanilla extract
2 tablespoons vegetable oil
1 cups shredded carrot
1 cup shredded zucchini
2 cups shredded apple
1 cup raisins (or craisins)
1 cup chopped walnuts (or sunflower seeds)

1. Preheat oven to 350 degrees F (175 degrees C). Grease muffin pan or line with paper muffin liners.
2. In a large bowl, mix together flour, flax seed, oats, brown sugar, baking soda, baking powder, salt and spices. Add the milk, eggs, vanilla and oil; mix until just blended. Stir in the zucchini, carrots, apples, raisins and nuts. Fill prepared muffin cups 2/3 full with batter.
3. Bake at 350 F (175 degrees C) for 15 to 20 minutes, or until a toothpick inserted into the center of a muffin comes out clean.

Makes 18 muffins

 
Peanut Butter Banana Chocolate Chip Muffins

1/2 c. butter
1 c. brown sugar
3/4 c. peanut butter
2 eggs
1 tsp vanilla
3 medium overripe bananas, mashed
1 tsp baking soda
1 1/2 c. whole wheat flour (or 3/4 c. white and 3/4 c. wheat)
1/2 c. milled golden flax seed
1 c. mini chocolate chips

Cream butter and brown sugar. Blend in peanut butter.
Add eggs, vanilla, and bananas. Blend until smooth.
Stir in dry ingredients.
Fill each muffin cup with 1/4 c. batter.
Bake at 325 for 20-25 minutes.
Makes 18 muffins.
 

Pumpkin Bran Muffins

17.7 oz (about 6 cups) All Bran Bran Buds
2 c. old fashioned oats
2 c. boliing water
1 c. brown sugar
1/3 c. honey
1/4 c. oil
3/4 c. plain pumpkin or applesauce
4 eggs, slightly beaten
1 lg can pumpkin pie filling
1 tsp salt
4 c. unsweetened almond milk
3 tsp. cinnamon
1 tsp. nutmeg
2 T. vanilla
2 c. whole wheat flour
2 c. unbleached white flour
1 c. milled flax seed
5tsp. baking soda
1 c. raisins

In a large bowl, put 2 cups of the bran buds, 2 cups oatmeal, and boiling water. Cool. Add sugar, oil, eggs, pumpkin and spices. Mix well with mixer. Add remaining ingredients and mix by hand until all ingredients are mixed well. Fill muffin cups or tins almost full (about 1/4 c. in each). Bake at 325 until tops bounce back, about 20-25 minutes. **This is a giant recipe and makes 5 dozen muffins! They freeze well, though**

3 Favorite (Delicious and Nutritious!) Muffin Recipes

Sunday, September 16

I mentioned this recipe on instagram the other day, and had a request to post it. Aiden totally gobbled this down, and he is still fairly picky so any recipe he approves of is a keeper! Now I was making this up as I went along so the spices are just what I had on hand and could be easily modified. Also, I honestly have no idea how long I cooked this, but if you have made meatloaf before I am sure you can wing it, lol. See why I am not a real food blogger? Because I am counting calories though I am 99% sure this list of ingredients is accurate, hehe.

1 lb lean ground turkey
1 large carrot, grated
1 medium zucchini, grated
1 tsp minced garlic
2 T worchestershire
1 T dried minced onion
1 tsp poultry seasoning
1 tsp herb garden mix
1 tsp parsley
1/4 c marinara sauce
1/4 c grated parmesan
1/4 c oats
1/4 c dry quinoa, cooked in 1/2 c water and cooled
1 egg

I made this in a big muffin tin, the one that makes 6 jumbo muffins, and each loaf was then 211 calories according to MFP, just in case you were curious. Matt ate 2 and then took one for lunch the next day, so both boys gave it the big thumbs up.

Now for some cuteness! We took Aiden to see the animals at our little county fair and he had a blast. He is absolutely in love with baby chicks, and was constantly asking to climb in the pens with the goats! I have a little video of him feeding the goats, but I am the worst about getting my videos uploaded! Maybe I will try to post it later though. Anyhow, here is Aiden's first fair and petting zoo experience:


Summer Quinoa Turkey Meatloaf (and fair pics)

Monday, August 6

Instagram